
On my recent journey to Morocco, I was most excited to lead a mini art journal workshop with Project Soar just outside of Marrakesh. A week into my journey, it was one of the most anticipated parts of my trip.

My interest in art journaling has been a part of my life since I was a kid. I’m talking embellished coke bottles with collaged magazine clippings in high school, colorful & glitter filled holiday cards starting in my 20’s, a note to my secret crush in college, visual journals filled with magazine tears of what I want my life to be like, a baby book and visual love letter to our unborn daughter, and even a DIY collaged thank you card after our wedding...

As I wrote this, I decided to bust out a bunch of my journals and even an 80’s collage project (center) and took this photo. No wonder this post has taken awhile to write. Distractions, distractions...
After closing my boutique in Venice this past spring, art journaling has been a way to process my thoughts and feelings as I really try to focus on what will be the next phase of my business. Having a boutique is like having an ever rotating art project for me. Because the next evolution of a boutique I imagine to be more than just a clothing store, I keep a journal handy whenever a new thought arrives in my head. OFTEN!! Not only can I document my thoughts and ideas, I can also test out lots of new art techniques that I’ve been learning.
So when I made arrangements to do the workshop, I designed a project that would easily work for the girls at Project Soar. The Moroccan girls who attend the weekly sessions are school age girls who love the weekly fun of physical activity and art. The goal is to encourage these young women to stay in school and break the cycle of young brides, to let them know that they are worthy and capable of whatever life they choose. 
I trekked out to Project Soar early on Sunday, September 27th. Located just outside of Marrakesh, in the village of Douar Ladaam. After a round of trampoline jumping, I had to opportunity to share in the opening circle where Maryam Montague and her husband, Chris of Peacock Pavilions welcomed the girls. Everyone proudly said their names and repeated the affirmations, reminding themselves and each other why they are participating.
Project Soar has empowering affirmations that incorporate the following sayings...
“I am Strong"
“I am Capable"
“I am Smart”
“I am Worthy"

After introductions, the girls did a round of soccer near Peacock Pavilions and took a break...

Then we worked our way over to the building that houses their weekly art activities.

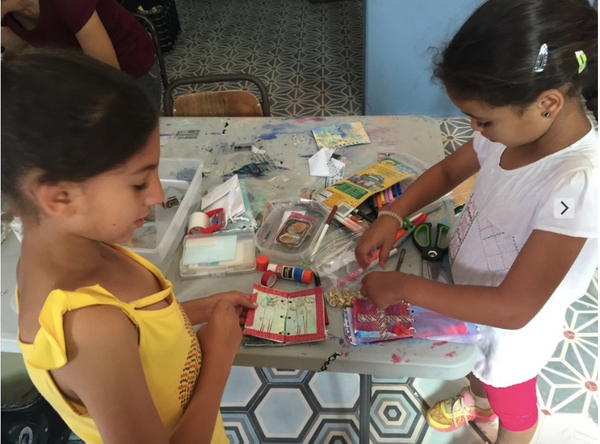
For the workshop, I was fortunate to have a bunch of helpers and volunteers, including a few translators. I speak French pretty well, but most of these girls speak Arabic. My friend, Cindy walks with the girls to the workshop space.
I did an introduction and made sure to emphasize the reason for the mini art books. To be pretty? No. The goal is to enjoy the process, and to have a place to write their goals and dreams. A visual diary, a place and space to hold their feelings. I learned this from Lisa Sonora, who I absolutely adore how she works through the journaling process. Using the art supplies that I brought in tow, we quickly got to work.
Using craft paint, and heavy duty multimedia paper, we coated the front and back of each page with a thin layer (or two!) of craft paint, using a credit card as the scraper.


We folded up our thick papers, cutting the pages to scale.

After, we worked on using a packing tape transfer technique. This was a great way to add their written affirmations as well as magazine images that they liked.


After the mini pages were done, we moved on to binding... We punched holes in the books and bound them with metal rings or yarn. And then... I showed them how to use stamps, markers, wash tape and glue sticks to embellish their books.

Like so many art projects, it feels quiet, then chaotic, then lively, then full of joy as you see your finished project come together.


Voila!

Want to make your own mini art journal? Here’s how:
Materials needed:
Multimedia paper – any paper that’s thick enough to handle a few materials on it. Brown paper bags also work great.
Craft paint
Credit cards or used grocery store cards
Hole punch
Key chain ring (or yarn / string) for binding
Clear packing tape
Photocopies of words or images (not an inkjet printer)
Magazine images (medium, not super glossy paper)
Ephemera
Novelty tape / washi tape
Stickers
Stamps
Ink pad
Pens & Markers
YOUR IMAGINATION.
Where to Start?
Art Journals are designed not to be perfect and not necessarily to be the prettiest piece of art that you have ever done. The purpose is to get your thoughts and feelings on paper and to work through them. What are your dreams? What are your thoughts? Sometimes you will put the image down first, then write. Sometimes you will simply write.
THERE ARE NO “MISTAKES” or ugly pages. If you don’t like something that you wrote down, you can cover it up. The more layers and images, the better.
Create an image transfer of your mottos/sayings that you would like to reinforce & think about. And then write on that page or next to that page WHAT do these mean to you? Paste down an image if you want. Sometimes that is easier than words. AND THEN the words will come to you.
Other guidelines:
If you have an image of yourself, make a copy of it and put that in the book.
Name and contact info on the inside of the book.
THESE ART JOURNALS ARE individual for each person. There is no right, no wrong. None are better than the others. They just are. They aren’t to be critiqued but acknowledged and allowed for self expression.
Create a “Lock” on one side with a hole punch and yarn if you want it to be private.
Tape transfer technique:
Use CLEAR packing tape.
Magazine images (not too glossy)
Photocopies (not ink jet, the ink smears)
Adhere the tape to the image that want.
Cut around the excess.
Burnish the tape to the image/rub it down, I used the back of my scissors.
Soak in water approx. 10 to 15 minutes
Remove the paper from the back of the tape
VOILA!
Please post in the comments if you try this journal or have tried anything similar, I would love to hear from you!
XO, M.E.